

How to set up a headless Raspberry Pi on Windows 10 and Windows 11
 Source: Windows Fundamental
The simply limit to what y'all can do with a Raspberry Pi is your imagination, but even if your ambitions are a little more basic, at that place's still lots of fun to be had. In many use cases, you lot'll be looking at using a Raspberry Pi headless, that is to say without it existence attached to a brandish. Information technology's likewise perfectly possible to set information technology up this way using your Windows 10 or Windows xi PC. Here's how.
Grabbing the software you need
 Source: Windows Fundamental
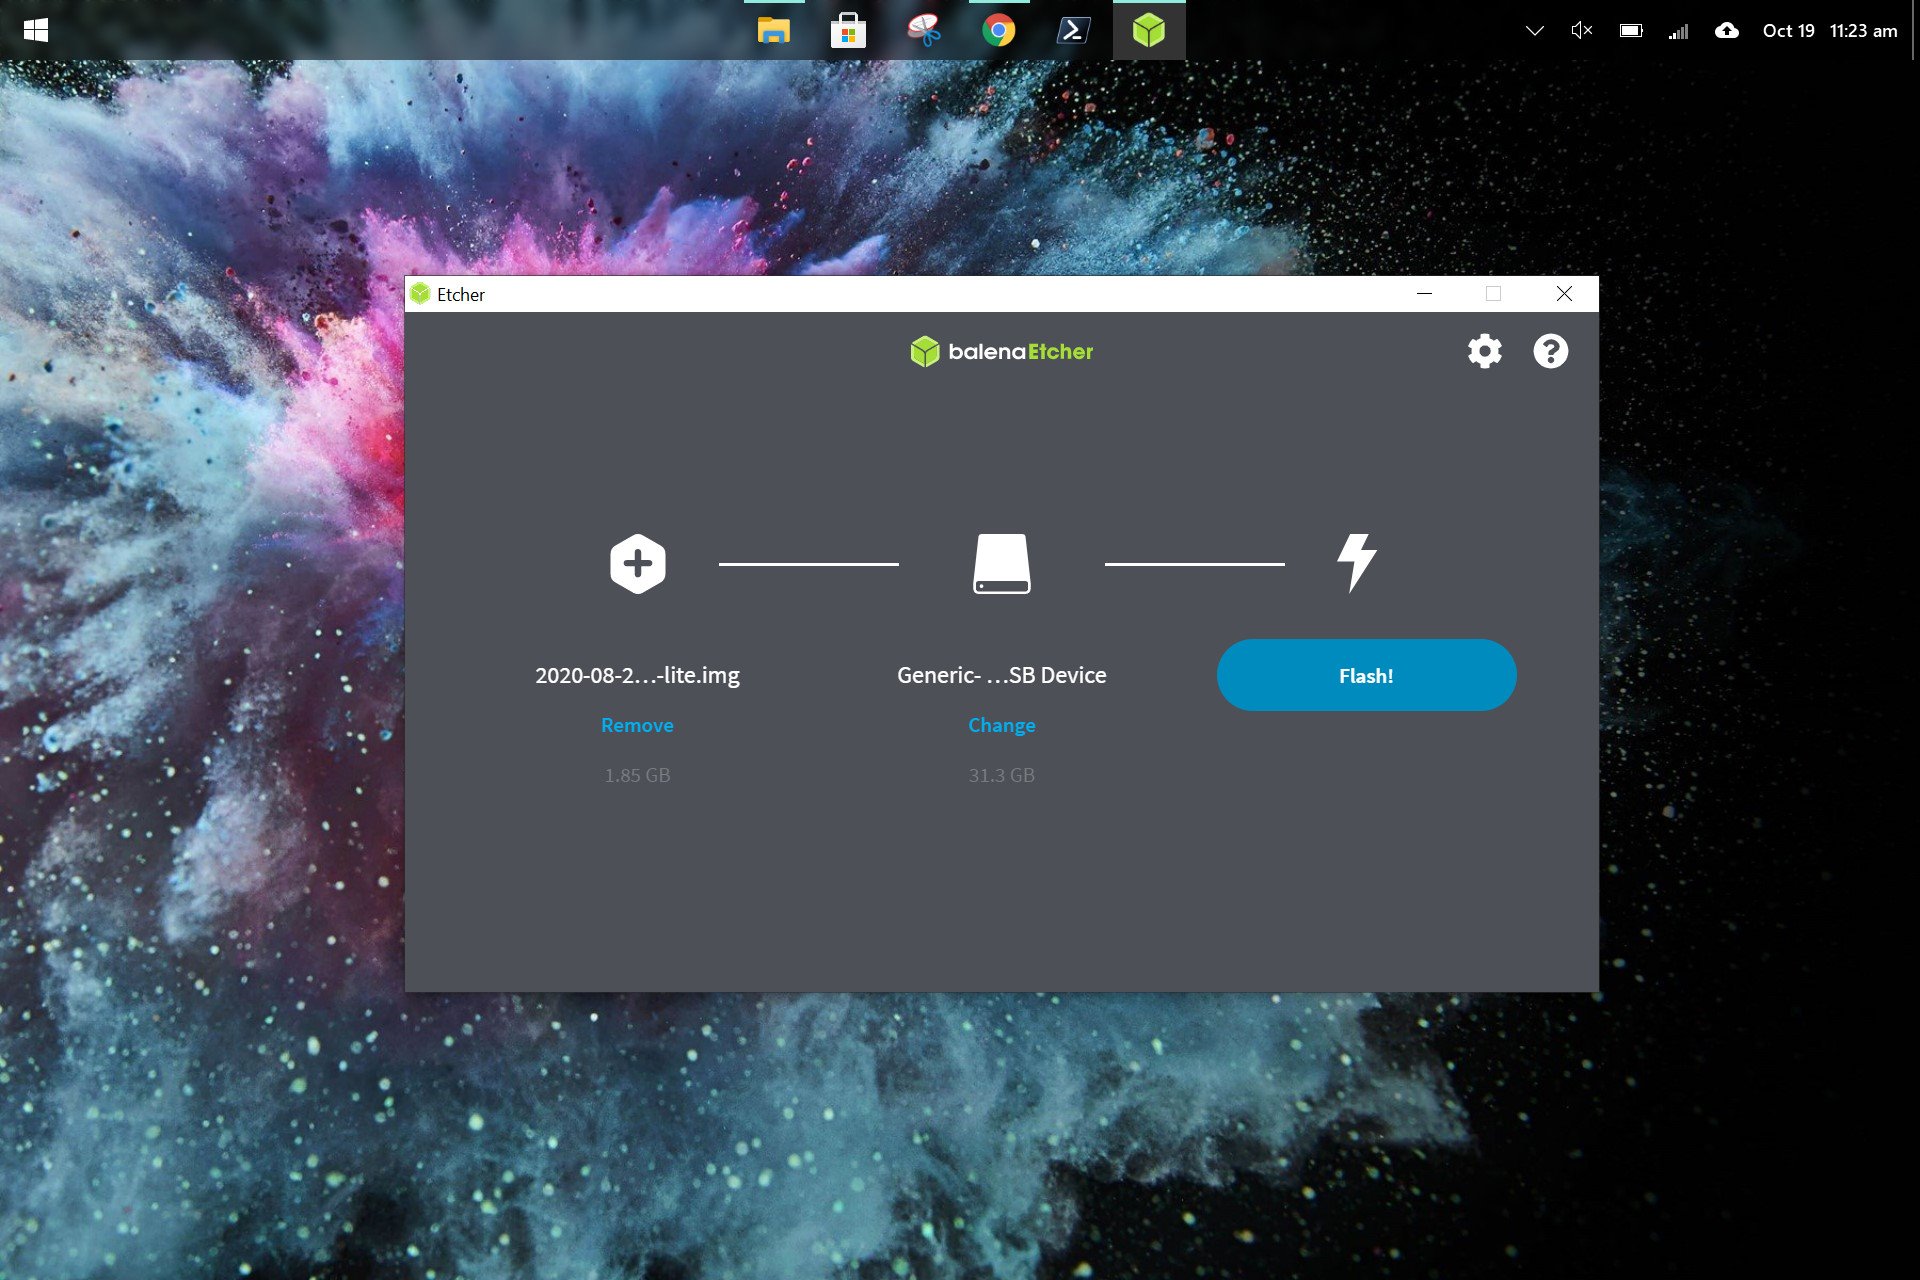
Earlier you do anything, you'll need both a re-create of the Os for the Raspberry Pi and something to wink an image of it to the microSD card. Raspberry Pi has its own imager only for the purposes of this guide we're using a 3rd-party app called balenaEtcher since it has uses beyond just the Raspberry Pi and is a useful tool to accept effectually.
Then y'all'll need to go to the Raspberry Pi downloads folio and grab a copy of the Bone. We're just going to use the standard Raspberry Pi OS for this guide, a customized version of Debian Linux built especially for the Raspberry Pi. There are diverse downloads available from the Raspberry Pi website, but for the purposes of what nosotros're trying to exercise here catch a copy of the "Light" download.
You ideally desire the Lite version for headless setup, peculiarly on a Raspberry Pi Zero, as it's a much lighter image with a smaller download footprint and importantly, no desktop UI. As we won't be using it in that location's no need to waste material resources on it.
How to flash the Raspberry Pi OS image on Windows x and Windows xi
 Source: Windows Primal
The kickoff stride is to wink your microSD bill of fare with the Bone image for the Raspberry Pi.
- Locate the downloaded zip file of the Raspberry Pi Os Lite image.
- Excerpt the files and note the location of the extracted image.
- Load up balenaEtcher on your PC.
-
Select Flash from file.
 Source: Windows Key
 - Select your extracted Raspberry Pi OS image from pace 2.
- Connect your microSD card to your PC.
- Click Select target.
-
Choose your microSD card.
 Source: Windows Central
 -
Click Flash!
 Source: Windows Primal


BalenaEtcher volition now run through a short process that should but have a couple of minutes (depending on your hardware), and when you're done exit it attached to your PC for the next step.
How to gear up upward Wi-Fi and SSH access on your Raspberry Pi
 Source: Windows Key
The key to being able to ready a headless Raspberry Pi is being able to connect to it from your Windows PC. For that, yous'll demand it to exist on your local network, and while you could use Ethernet, on the Raspberry Pi Nothing, in particular, this requires additional hardware and it's really not necessary.
To connect the Raspberry Pi to your home network and allow remote admission we need to ensure it has two things:
- Your Wi-Fi network SSID and password
- SSH
Both of these we'll add together from your PC.
- Ensure your Raspberry Pi OS microSD card is fastened to your PC.
- Open File Explorer.
- Select the microSD card, it should be called boot.
- Inside the root directory, right-click and select New and so Text Document.
- Name this file ssh.
- Right-click and select Rename.
- Delete the .txt extension.
- When prompted to confirm, click yes.
 Source: Windows Primal
Information technology's of import to brand certain the blank file has no file extension to role properly. You'll know information technology has been successfully inverse every bit the icon will now look like a blank piece of newspaper compared to 1 with lines on it.
Next, we'll build a file containing your Wi-Fi network credentials.
- Ensure your Raspberry Pi OS microSD card is attached to your PC.
- Open File Explorer.
- Select the microSD card.
- Within the root directory, correct-click and select New and so Text Document.
- Rename this file to wpa_supplicant.conf ensuring that the .txt file extension has been replaced.
- When prompted to confirm, click aye.
- Correct-click on the file and choose Open with ....
- Select Notepad or your own preferred text editor.
Once you have the wpa_supplicant.conf file open in a text editor, yous'll need to enter some code to tell your Raspberry Pi how to connect to your network. Gear up your file like the image below.
 Source: Windows Cardinal
Enter the name of your Wi-Fi network within the ssid quotation marks and your network password inside the psk quotation marks. And so save the file. Besides, ensure you change the country to the two-letter code for your location.
And then save the file and shut Notepad.
How to fix the Raspberry Pi using SSH
 Source: Windows Key
There was a fourth dimension that you'd have to install a tertiary-party application such as PuTTY to use SSH on Windows, only that'southward not the case anymore; you can simply do information technology through the last. PowerShell works only fine, but if you have WSL enabled y'all tin can also utilize the Linux terminal assuming yous have SSH enabled in information technology. Ubuntu, for example, has information technology out of the box, but Debian does not.
For this, we'll exist using the standard Windows PowerShell. Before getting started brand certain the kicking microSD is inserted in the Raspberry Pi and that you ability information technology on. You also need to find out the IP accost on your network for the Raspberry Pi. There are many ways to exercise this, but the easiest is to just look in your router'due south settings for connected devices and locate it in that location. If you're but using ane Raspberry Pi on your network, the default pi@raspberrypi.local can be used to connect, just this volition neglect as y'all add more devices, so information technology's worth going with the IP accost.
And so follow these steps.
- Open Windows PowerShell.
-
Type
ssh pi@yourIPaddress. Source: Windows Central
 -
When prompted at the authenticity message, type aye and press enter.
 Source: Windows Cardinal
 -
When prompted for a password enter raspberry.
 Source: Windows Central
 - If you're non taken into the Raspberry Pi final, repeat step ii followed by step 4 again and it should work fine.


Y'all should now be presented with a short welcome blurb from Linux having successfully connected to the Raspberry Pi. The prompt will as well have changed from PowerShell to pi@raspberrypi.
The start thing to practice is to change the default password from raspberry.
-
In the concluding type
passwd. Source: Windows Key
 - When asked for the electric current countersign enter raspberry.
- Choose a new countersign and printing enter.
-
Confirm the new password and press enter.
 Source: Windows Central


Assuming they match you'll encounter a confirmation message that you successfully changed the countersign. This is at present the password yous'll utilise when logging in to your Raspberry Pi over SSH.
The basic setup of the Raspberry Pi is now done, but there are a couple of basic commands to run first before you exit out of it. These are bones Linux commands that you'll employ quite frequently, but essentially it'll ensure your Raspberry Pi is all up to date. Enter these two commands:
sudo apt update
sudo apt upgrade
 Source: Windows Central
The first run-through of these commands may take some time, especially on a Pi Zero. And so, one time you're washed with your Raspberry Pi yous can quit dorsum to regular onetime Powershell merely past typing '''quit''' into the last.
While you tin use PowerShell or whatsoever installed WSL Linux distros to SSH into your Raspberry Pi, if y'all're going to eventually handle multiple machines at that place are more elegant ways to handle and manage your connections. On Windows, there's the erstwhile favorite, PuTTY as well as the popular and elegant cantankerous-platform client, Termius.
And that's all you lot need to know. Past at present yous'll have a fully functioning Raspberry Pi that you can interact with and get artistic with all without the need for a display, mouse, and keyboard.
Our top equipment picks
These are the mandatory or core equipment selections. Optional or coincident equipment will follow.
Tiny computer
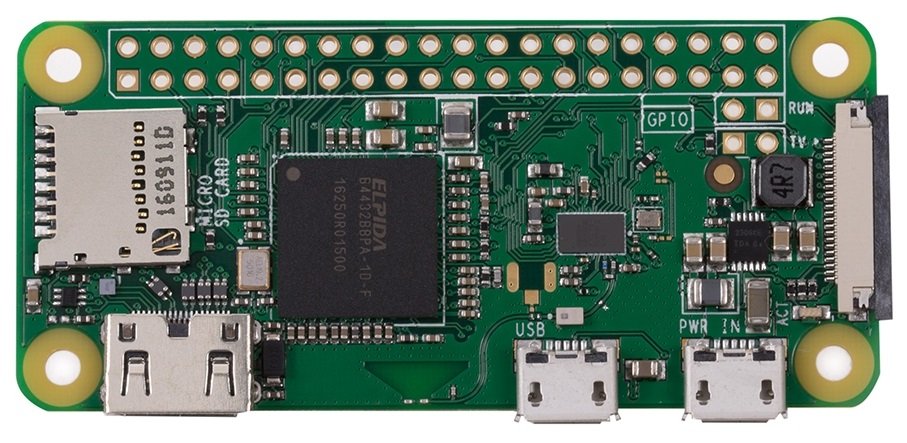
Raspberry Pi Nada W
Teeny nonetheless capable computer
The Raspberry Pi Zero West is still a fantastic and incredibly affordable way to dip your toe into the ecosystem or Linux in general.
This procedure is the aforementioned whether you go for the Raspberry Pi Aught or the regular model, but the Pi Zero is a great way to dip your toe and commencement to acquire virtually Raspberry Pi. If y'all're new to things like SSH, terminal, or even simply Linux in full general, it'due south such an affordable manner to get started and learn some new skills, with the added bonus that the maker ecosystem is enormous. The merely limit is your imagination.
Additional equipment
Setting up a Raspberry Pi is quick and cheap, simply also the actual board, you'll need a couple of other essentials to make this headless setup happen.

Samsung EVO Select 32GB microSD card ($8 at Amazon)
You don't demand a ton of storage on a Raspberry Pi, and fifty-fifty 32GB will go a fairly long way.

CanaKit Raspberry Pi ability supply ($10 at Amazon)
The Raspberry Pi gets its power over micro-USB, so if you've thrown out all your sometime phone chargers, catch this ane every bit a dedicated unit.
We may earn a commission for purchases using our links. Learn more.

Buyer'south guide
These are the best Netgear routers available now
Love Netgear and want to ameliorate your home internet? We've rounded up the all-time routers available now, whether you're looking to game, ready a mesh network, or just bask lag-costless internet in your home.
How to fix a headless Raspberry Pi on Windows ten and Windows eleven
Tiny computer


Source: https://www.windowscentral.com/how-set-headless-raspberry-pi-windows-10
Posted by: vazquezbence1954.blogspot.com
0 Response to "How to set up a headless Raspberry Pi on Windows 10 and Windows 11"
Post a Comment